
Note
Updated July 2026: When this article first appeared in 2022, there was no official way to add your own endpoint to the platform APIs, so it documented a workaround. Salesforce has since shipped SCAPI Custom APIs, and in April 2026 the OCAPI itself was deprecated. The first half of this article now covers the supported route; the original walkthrough is preserved below, for the archives.
The OCAPI (Open Commerce API) has been around for many years, giving the platform a sound basis for “headless” applications to connect to different parts of Salesforce B2C Commerce Cloud. These days it is also officially deprecated: since April 2026, it receives security patches only, and every documentation page carries a “(deprecated)” label.
Although the APIs need to remain close to the standard, some endpoints can be customised via a system called “hooks.”
But how about adding completely custom endpoints?
When I first wrote this article, the honest answer was “not officially” — and the rest of the post was a workaround built on custom objects and a GET hook. That answer has expired: custom endpoints are now part of the SCAPI itself, and the workaround below has become a museum piece. So let’s start with the way you should actually build one.
The Official Answer: SCAPI Custom APIs
With a Custom API, you define a REST endpoint in a cartridge, and the platform serves it through the SCAPI framework. You describe the endpoint in a contract and implement it as a regular B2C Commerce script. The platform handles the routing, authentication, and error handling that the 2022 version of me had to borrow from the Custom Objects resource.
The feature arrived as an open beta in the 23.9 release — GET calls only at the time — and went GA in 24.2. Since then, the Script API has grown helpers like dw.system.RESTResponseMgr for building success and error responses.
Custom APIs live in a rest-apis folder inside your cartridge, one subdirectory per API. The directory name becomes the API name in the URL, so it is restricted to lowercase letters, numbers, and hyphens:
my_cartridge/cartridge/rest-apis/loyalty-info/
├── api.json
├── schema.yaml
└── script.js
Three files, three jobs:
- The contract (
schema.yaml): An OAS 3.0 schema describing your endpoints, parameters, and responses. This file is not documentation after the fact; it is enforced. The platform declines requests carrying parameters you did not declare, and custom query parameters must be prefixed withc_. - The mapping (
api.json): Connects each endpoint to its schema and its implementing script. - The implementation (
script.js): A script using the B2C Commerce Script API, exporting one function per endpoint.
The mapping file is the simplest of the three:
{
    "endpoints": [
        {
            "endpoint": "getLoyaltyInfo",
            "schema": "schema.yaml",
            "implementation": "script"
        }
    ]
}
And the implementation exports a function whose name matches the operationId defined in the contract:
'use strict';

var RESTResponseMgr = require('dw/system/RESTResponseMgr');

exports.getLoyaltyInfo = function () {
    RESTResponseMgr.createSuccess({ points: 42 }).render();
};
Deploy the cartridge like any other, and the endpoint answers at its own URL:
https://{shortCode}.api.commercecloud.salesforce.com/custom/{apiName}/{version}/organizations/{organizationId}/{endpointPath}
That /custom/ segment is the giveaway: your endpoint sits on the same host and behind the same gateway as every standard SCAPI family. Versioning comes from the contract. Version values are numeric and can carry segments (1.2), but the URL keeps only the major segment prefixed with v — so contract version 1.2 answers at v1.
Shopper or Admin
Every endpoint declares itself as either a Shopper or an Admin endpoint through its security scheme, and that one choice sets most of the rules it lives under:
- Shopper endpoints use the
ShopperTokenscheme: callers authenticate with a SLAS shopper token and must pass asiteIdquery parameter. Runtime is capped at 10 seconds and request bodies at 5 MB, and calls count against the storefront quotas. - Admin endpoints use the
AmOAuth2scheme: callers authenticate with an Account Manager client token and must omitsiteId. The caps relax to 60 seconds of runtime and 20 MB bodies.
Blow past the runtime budget and the gateway answers with an HTTP 504 instead of your payload. If 10 seconds sounds tight for that one heavy integration, the Timeouts API can stretch a Custom API timeout to a maximum of 120 seconds — but treat that as a painkiller, not a cure. The platform limits exist for a reason.
On top of the scheme, every endpoint must require exactly one custom scope: a scope you define yourself, prefixed with c_, at most 25 characters. You assign it to a SLAS client for Shopper APIs or to an Account Manager client for Admin APIs, and only tokens carrying that scope can call the endpoint. The workaround below, by contrast, opened the whole /custom_objects/*/* resource to a client ID.
What the Workaround Never Gave You
The comparison is not close:
- Real routing: A Custom API has its own URL and its own name. The workaround pretended to fetch a custom object and smuggled the actual response in through a hook.
- Every HTTP method — with transactions: The hook hack was limited to GET, and a GET hook is forbidden from opening transactions. Custom APIs support POST, PUT, PATCH, and DELETE, and state-changing methods can open a
dw.system.Transactionand write to the database. The two limitations that defined the original article are gone. - A contract: The OAS schema validates every request before your script runs. The workaround happily accepted whatever showed up in
httpParameters. - Standard error responses:
RESTResponseMgr.createError()produces the same problem-details error shape as the rest of the SCAPI, instead of a hand-rollederrorproperty tucked into the payload. - No Business Manager registry: No custom object type, no object instance per endpoint, no OCAPI settings JSON. The endpoint ships entirely with the cartridge.
The wider migration picture — what “deprecated” means in practice, the maintenance window, what to audit first — is covered in the OCAPI versus SCAPI rematch. The short version: endpoints built on the pattern below keep working until the OCAPI’s maintenance window closes around April 2028, but every one of them is now a migration ticket waiting to be written.
For the Archives: The 2022 Workaround
What follows is the original article as it ran in July 2022, preserved for the archives. Read it as a period piece: “no official way” was true at the time of writing, the 22.6 in the OCAPI settings was the current API version back then (the numbering stopped at 24.5), and the GET-only, no-transactions ceiling belongs to this workaround — not to Custom APIs. The example repository is still on GitHub.
Warning
Insecure example ahead: The example I have used (getCustomer) is an example of something you should not do because of security reasons. It just shows the possibilities, and you should consider performance, security, and common sense when building these endpoints.
Is there no “official” way
The OCAPI provides a set of predefined endpoints you can not stray from. There is no out-of-the-box feature that allows you to create your endpoint on top of the existing set of REST APIs.
The only thing you are allowed to do is modify existing endpoints, but not all of them. A list of which customisations you are allowed to do is available on the Salesforce Commerce Cloud Infocenter.
TLDR; Just give me the solution
I have created a complete example available on GitHub based on the “sfcc-hooks-collection” project originally provided by Holger Nestmann (that repository is no longer available, but the credit still stands).
You can find that repository in the OCAPI custom endpoints example repository. Inside, you will find an example of a custom “get-customer” API added to the OCAPI.
Limitation of this custom solution
The solution provided in this article will only allow you to create custom GET calls without any transactions.
This is because we will add a hook to the GET call of Custom Objects in the Shop API.
And a limitation of a hook added to a GET call is that opening transactions is forbidden (no creates or updates in the database).
Note: Do not modify a Script API object in an HTTP GET request or a modifyResponse hook, because they are never executed in a transactional context. It can cause an ORMTransactionException and an HTTP 500 fault response. Infocenter
Custom Objects
Yes, custom objects! Since we have complete control of the naming and creation of custom objects, it is the perfect candidate. And because it allows us to add a hook to the REST GET call, it provides an ideal opportunity to create custom endpoints in the context of the customer session.
Step 1: Create the Custom Object Type
So let’s get cracking! The first step is to create a new custom object type in the business manager that we can use in the OCAPI.
Go to Administration > Site Development > Custom Object Types.
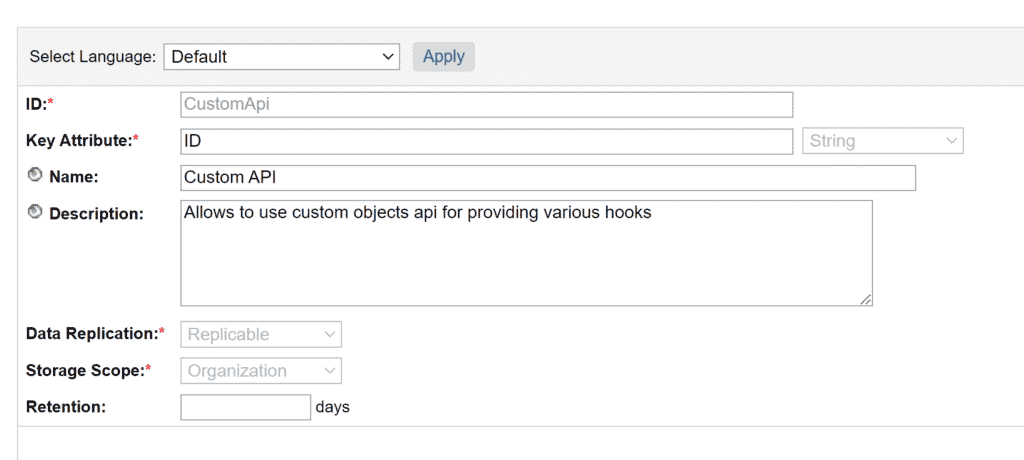
The Custom Object Definition is quite simple:
- ID: CustomApi
- Key Attribute: ID of the type String
- Name: Custom API (though this doesn’t matter)
- Description: Whatever you like ;-)
- Data Replication: Replicable (we don’t want to configure this separately per environment)
- Storage Scope: Organisation (it doesn’t make sense to do this on the Site level)
There is also an import file available on the GitHub repository.
Step 2: Create the Custom Object for your API
Each custom API endpoint needs its unique object of the “CustomApi” type. So in this example, we will make one get customers by their “Customer Number.”
To do this go to Merchant Tools > Custom Objects > Manage Custom Objects.
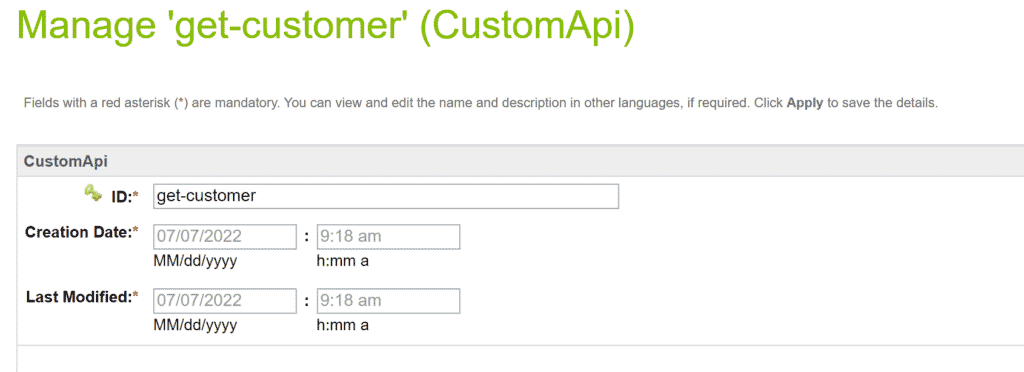
The Custom Object is, again, easy to set up:
- ID: get-customer (this is important as we need this ID to call the service and the script we will put behind it)
There is also an import file available on the GitHub repository.
Step 3: Configure OCAPI access
We also need to make sure we can access the GET call for the Custom Objects endpoint. To provide access we go to:
Administration > Site Development > Open Commerce API Settings.
Fill in the following value for the type Shop and context Global (Organisation-wide).
{
    "_v": "22.6",
    "clients": [
        {
            "client_id": "aaaaaaaaaaaaaaaaaaaaaaaaaaaaaa",
            "allowed_origins": [],
            "resources": [
                {
                    "resource_id": "/custom_objects/*/*",
                    "methods": [
                        "get"
                    ],
                    "read_attributes": "(**)",
                    "write_attributes": "(**)"
                }
            ]
        }
    ]
}
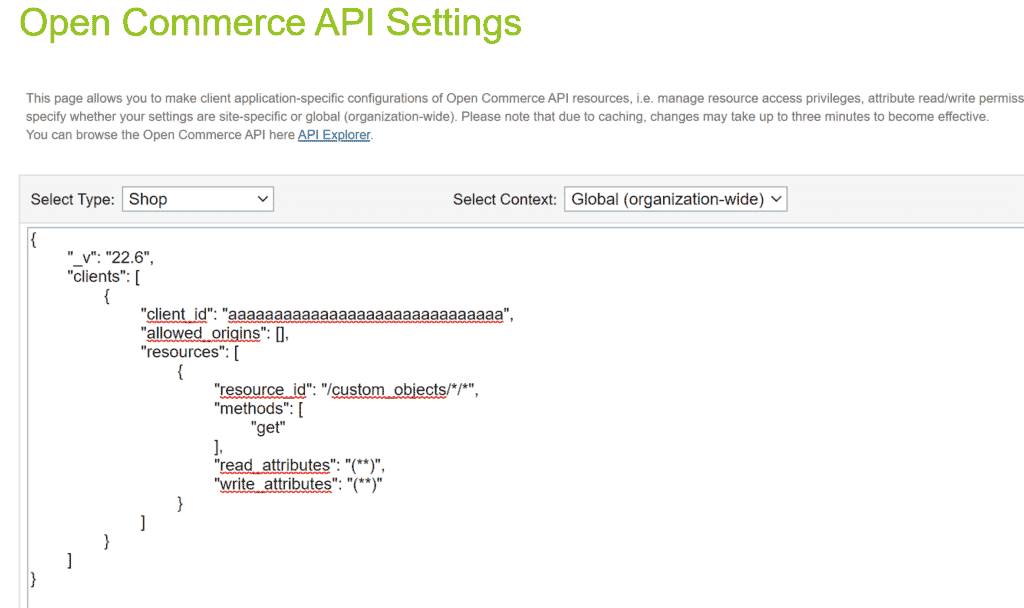
In the example, we make use of aaaaaaaaaaaaaaaaaaaaaaaaaaaaaa ( 30 x a ), which is a Client Id that works on test environments without creating it in the Account Manager.
You can, of course, create your own Client ID, but we will not be covering that process in this article.
Step 4: Create our custom hook
Time to start coding (finally)! But before we start creating our scripts, we need to tell Salesforce B2C Commerce Cloud that we want to “hook” into an OCAPI endpoint.
For this, we create a package.json file in the root of our cartridge with the following contents.
{
  "hooks": "./hooks.json"
}
This file says a “hooks” config file is available in our project. Now we also have to make that file!
{
    "hooks": [
        {
            "name": "dw.ocapi.shop.custom_object.modifyGETResponse",
            "script": "./cartridge/scripts/hooks/customObjectsHooks.js"
        }
    ]
}
In this file, we declare that we want to modify the GET response of the Custom Object endpoint with a specific script.
Not sure where to create these files? Have a peek at the GitHub repository!
You probably noticed that we also need to create a script file 😉. So let us also do that at the location defined in “hooks.json.”
'use strict';
var toCamel = function (s) {
    // eslint-disable-next-line no-useless-escape
    return s.replace(/(-[a-z])/g, function ($1) { return $1.toUpperCase().replace('-', ''); });
};
/**
 *  Custom Object Modify Get Hook
 * @param {Object} scriptObject - the database object
 * @param {Object} doc - the document
 */
exports.modifyGETResponse = function (customObject, doc) {
    if (customObject.type === 'CustomApi') {
        var result = require('*/cartridge/scripts/apis/' + toCamel(customObject.custom.ID)).get(request.httpParameters);
        doc.c_result = result;
    }
};
Another simple step as the script does not contain anything complicated. It does the following things:
Check if the API call is for an object of type “CustomApi,” which we created earlier. We should not execute any custom code if it is of another type.
Use the custom object ID we defined to call the correct script. This is, however, treated to become a camel-case filename.
For example: “get-customer” becomes “getCustomer.”
The dynamic require is executed, and the result object is stored in a variable.
The resulting object is added to the response object prefixed with “c_.”
In our example, the code will execute our “getCustomer.js” file, which looks something like this:
'use strict';
/**
 * Fetch customer data using the Customer Number.
 *
 * WARNING: This is a very unsafe endpoint as you can fetch all accounts with an ID that is incremental! The idea is
 * just to show what is possible! And that with this possibility you can create serious security holes!
 *
 */
exports.get = function (httpParams) {
    var result = {};
    if(!empty(httpParams.customer_no)) {
        var CustomerMgr = require('dw/customer/CustomerMgr');
        var customer = CustomerMgr.getCustomerByCustomerNumber(httpParams.customer_no.pop());
        if(customer) {
            result.first_name = customer.profile.firstName;
            result.last_name = customer.profile.lastName;
        } else {
            result.error = 'Customer not found';
            result.customer_no = httpParams.customer_no;
        }
    }
    return result;
};
Are you a bit confused about where to place these files? Have a look at the GitHub repository!
Step 5: Upload the cartridge
As with any cartridge, we need to upload it to our environment. Don’t forget to add it to the cartridge path of your site(s) (not the BM Cartridge path).
We add it to the sites because the API is part of the Shop API, which is meant for Storefront applications.
Step 6: Call the API
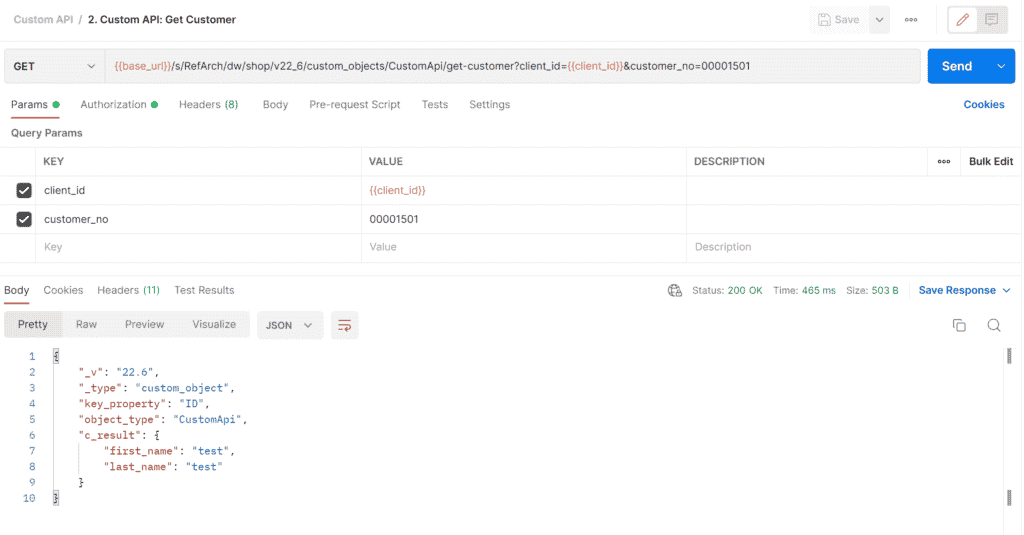
The final step is calling your endpoint (with the correct parameters). In this case, we have the parameter “customer_no,” which we use in our custom code to fetch the right customer.
To make it easier to understand how to test the API, I added a Postman collection to the GitHub repository.
This collection requires you to configure the following variables:
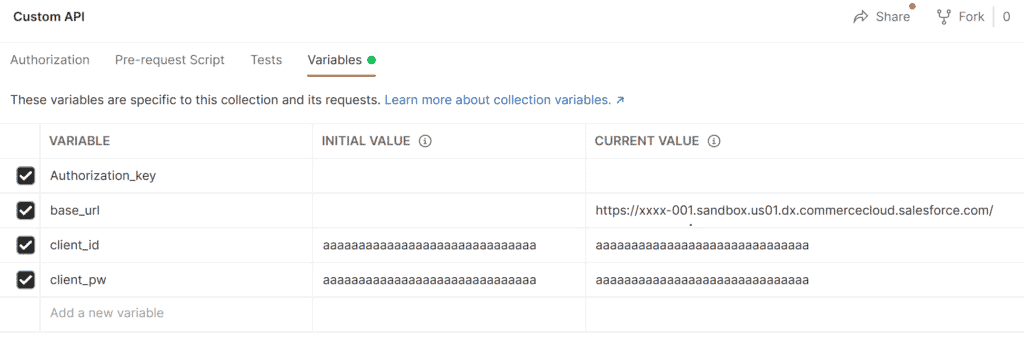
- base_url: The domain of your environment.
- client_id: Your client ID, you can use the default one.
- client_pw: Your client password, you can use the default one.
The collection also contains two premade API calls:
1. GetOAuth2 client token: This fetches the bearer token
2. Custom API: Get Customer: The call to fetch the Custom Object with the customised response
Final thoughts
Although this might seem like a “hacky” way to get a custom API up and running in the OCAPI, it allows you to create a custom endpoint without worrying about an authorisation/authentication/caching framework.
It’s not perfect, but this gives you another option to add to your arsenal to tackle specific use-cases thrown at you.
And it is always nice to have options!