

Note
Updated July 2026: Salesforce officially deprecated the OCAPI in April 2026. The endpoints this JWT unlocks are now maintenance-only, but the authentication itself is not going anywhere: SCAPI Admin and Data API clients use this exact
private_key_jwtflow through the same Account Manager. Everything below still applies. One thing that does not carry over: Shopper-context SCAPI access goes through SLAS (Shopper Login and API Access Service), a separate system with its own client setup.
This article covers server-to-server communication: a scheduled job, a middleware service, or another integration proving its own identity to Salesforce, with no human and no login screen involved. The OCAPI (Open Commerce API) still needs that proof on every request, the same as it would from a person. You just need a way to authenticate the calling system itself.
Salesforce B2C Commerce Cloud gives you a few ways to do that:
- Basic Authentication using the API Key and the Secret
- Basic Authentication using the API Key, Secret, Username, and User Password
- JWT
This article focuses on the most involved of the three: JWT.
Generating a Public and Private Key Pair
JWT authentication relies on a key pair to sign requests: a private key you keep to yourself, and a public key (wrapped in a certificate) that you hand to Salesforce so it can check the signature. A pair like this is quick to generate, and you decide exactly how long it stays valid.
Open a terminal and run the following command in a folder of your choice:
openssl req -x509 -newkey rsa:4096 -keyout key.pem -out cert.pem -days 365 -nodes
This command creates two files:
key.pem: your private key. Keep this one secret; you’ll use it to sign the JWT later in this article.
cert.pem: the certificate containing your public key. You’ll upload this to Account Manager in the next step.
Warning
key.pemandcert.pemserve very different purposes, and onlycert.pem, the public certificate, ever leaves your machine. Double-check which file you’re pasting before you get to the Account Manager step below, and never commitkey.pemto source control. Anyone who gets hold of it can sign requests as you.
Create a New API Key
Every server-to-server connection to Salesforce starts the same way: an API client in Account Manager. It’s the same screen you’d use for a SCAPI Admin API or Data API client too; only the scopes differ.
Follow the instructions on the Infocenter, with a few minor changes.
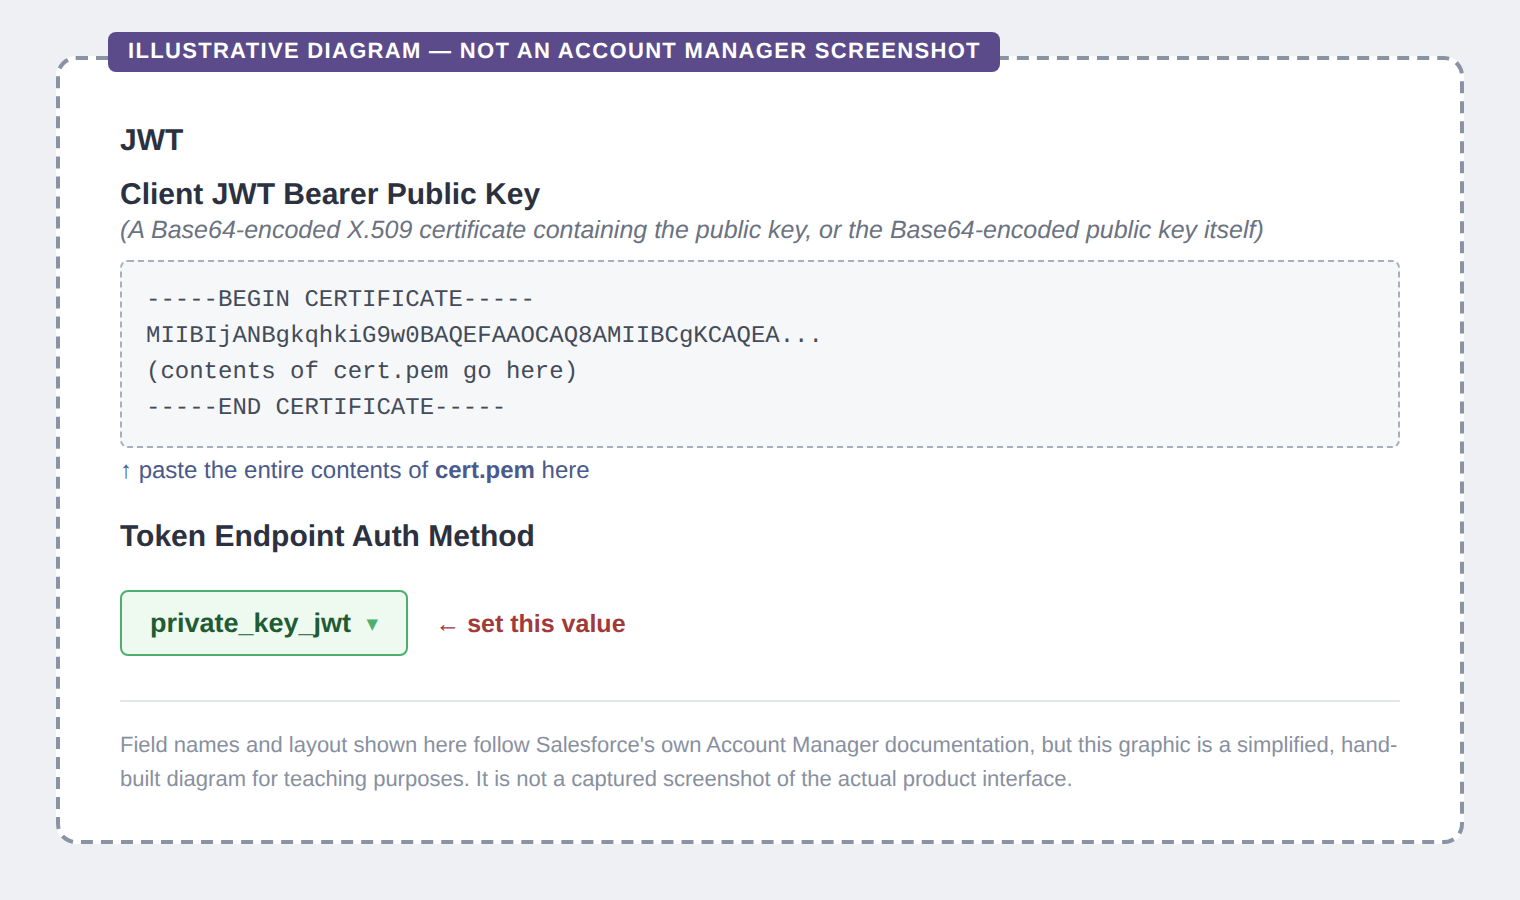
In the JWT field, paste the entire contents of cert.pem. No edits needed.
Set the Token Endpoint Auth Method to private_key_jwt.
Save the client, and you’re done here.
Authenticate
Generating the JWT is the hardest part of this whole setup. The payload has to be exact, and you still need to sign it with the private key from the previous step.
JWT
A JWT breaks down into three parts, shown below.
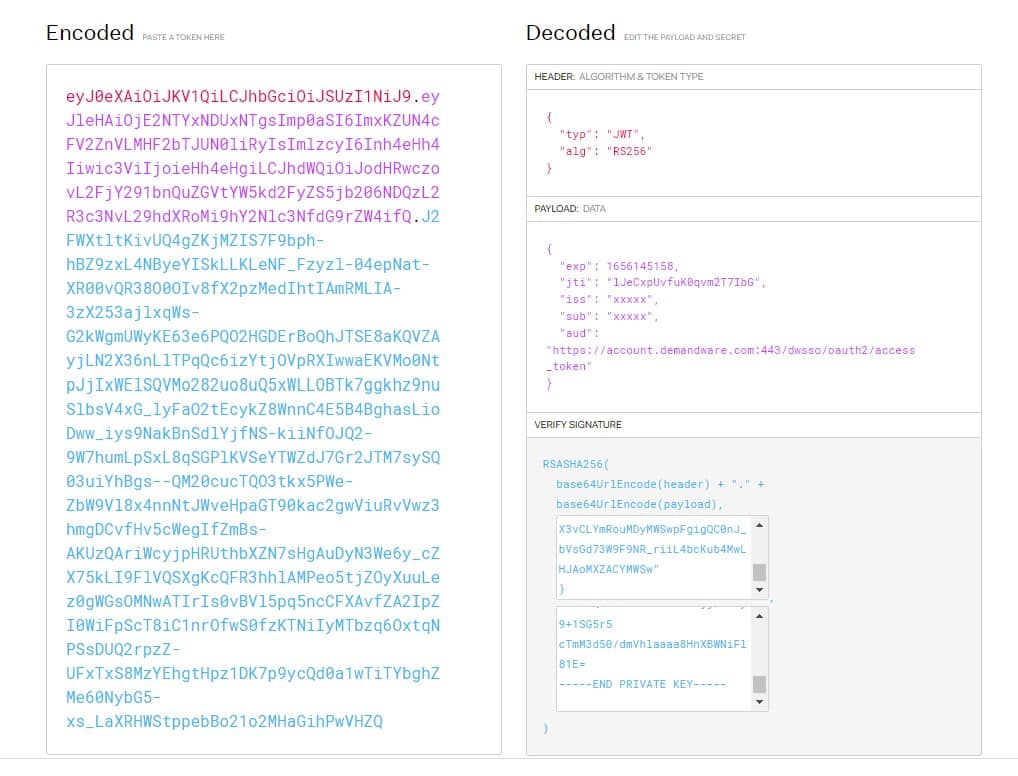
The header, which describes what type the JWT is and what algorithm it is using. Here, that’s RS256.
The payload, the actual claims about who is making the request. To get a token back, Salesforce B2C Commerce Cloud requires these claims:
- iss (issuer): The client ID (API Key)
- sub (subject): The client ID (API key)
- exp (expiration time): Current time + x seconds. Salesforce rejects this JWT if
expis more than 30 minutes in the future, but there is no reason to get anywhere near that ceiling: the token is used once, immediately after it’s signed, to fetch a real access token. The example below uses 5 minutes (300 seconds), which leaves plenty of room for clock drift and network latency while staying well inside the limit. - aud (audience): The Account Manager auth endpoint
- iat (issued at, optional): Current time. Not required to get a token back, but it is good practice to include it, and the example below sets it.
The signature, the header and payload signed with your private key, so Salesforce can verify the JWT actually came from you and was not altered in transit.
Generating It
The contents of a JWT are simple once you see them laid out like this. The hard part is signing it correctly, which means finding a solid signing library for whatever language or tool you’re using.
As an example, I put together a Postman collection to get you started.
In this example, you need to set two collection variables:
pkey: The entire contents of the key.pem file we generated earlier
api_key: The API key you generated in the Account Manager
There is also a variable called pmlib: a third-party library that adds cryptography helpers Postman doesn’t have natively, including JWT signing. In the collection, a request called “1. Download JS for Postman” downloads it if the default value stops working.
Postman can’t generate a signed JWT on its own. The second request in the collection, “2. Authorisation (JWT),” carries a Pre-request Script that builds the JWT and stores it in a collection variable, ready for the request that follows.
// Load third party library
eval(pm.collectionVariables.get("pmlib"));
// Prepare timestamp in seconds
var currentTimestamp = Math.floor(Date.now() / 1000)
// Create header and payload objects
var header = {
  "typ": "JWT",
  "alg": "RS256"
};
var payload = {
    'iss': pm.collectionVariables.get('api_key'),
    'sub': pm.collectionVariables.get('api_key'),
    'iat': currentTimestamp,
    'exp': currentTimestamp + 300, // expires in 5 minutes (300 seconds), well inside Salesforce's 30-minute maximum
    'aud': 'https://account.demandware.com:443/dwsso/oauth2/access_token'
};
// Generate the JWT and sign it
var sJWT = pmlib.jwtSign(pm.collectionVariables.get('pkey'), payload, header);
// Store the JWT to set in the body
pm.collectionVariables.set("jwt_signed", sJWT);
With the script in place and the collection variables set, send the request:
A POST to https://account.demandware.com/dwsso/oauth2/access_token
A body with these three values, as x-www-form-urlencoded:
client_assertion: The signed JWT generated by the script
client_assertion_type: urn:ietf:params:oauth:client-assertion-type:jwt-bearer
grant_type: client_credentials
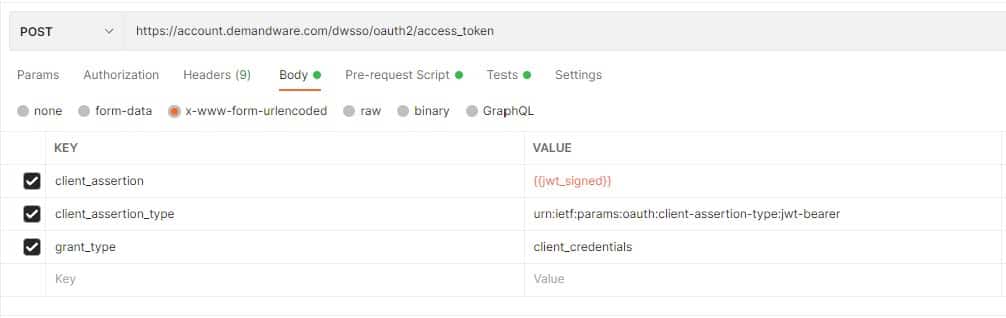
Thanks to Yuriy Boev and John Boxall for helping me get this example working. For other languages or scripts, the Unofficial Slack thread is a good place to look.
From here, the same signed JWT and Account Manager client work whether you’re calling the OCAPI today or a SCAPI Admin API tomorrow. Only the URL and the scopes change.